Plan Mode and Power Features
One of the most common mistakes new Claude Code users make is jumping straight into execution. You describe a feature, Claude starts editing files, and ten minutes later you realize it went in a direction you did not want. Rolling back is possible but painful. The solution is Plan Mode — a simple but powerful mechanism that forces Claude to think before it acts.
Plan Mode is activated by pressing Shift+Tab until you see the Plan indicator. In this mode, Claude can do everything it normally does except modify your codebase. It can read files, search code, analyze architecture, and reason about approaches — but it cannot write, edit, or execute commands that change state.
What it produces instead is a plan: a numbered, structured checklist of exactly what it intends to do. You review this plan, refine it if needed ("skip step 3, and do step 5 before step 4"), and then switch back to normal mode where Claude executes the approved plan.
Boris Cherny, the engineering lead for Claude Code at Anthropic, has stated that he uses Plan Mode for approximately 80% of his tasks. Even the person who builds the tool prefers to have Claude think before it acts most of the time. Plan Mode is not just for complex tasks — even simple changes benefit from a quick plan.
Use Plan Mode to explore and plan a feature, then switch to execution mode. You will see the difference between Claude thinking and Claude acting.
Step 1 — Fresh start: Start with a clean session — the previous exercises filled up context:
1
/clear
Observe: Context is reset. You have a full context budget for this exercise.
Step 2 — Switch to Plan Mode: IMPORTANT: Before typing anything, press Shift+Tab to cycle into Plan Mode. You should see a Plan indicator in the status bar. This switches Claude to read-only mode — it can explore and reason but cannot modify any files.
Run in terminal:
1
Shift+Tab
Observe: The status bar now shows Plan mode. Claude will not write, edit, or execute any commands that change your project.
Step 3 — Prompt to Claude (in Plan Mode): Now ask Claude to plan a feature that touches both the backend and the frontend:
The kanban board has no search. The API already supports ?search= on
GET /api/tasks, but there's no search bar in the UI. Add a search input
above the columns that filters tasks as you type. Plan the implementation.
Observe: Claude reads the route files and the frontend HTML but makes no edits. It produces a numbered plan — likely covering where to add the search input, how to wire it to the API or do client-side filtering, and how to update the board. Notice that Claude makes design decisions (client-side vs API filtering) without being told which to choose.
When Claude finishes the plan, you will see a prompt asking how to proceed:
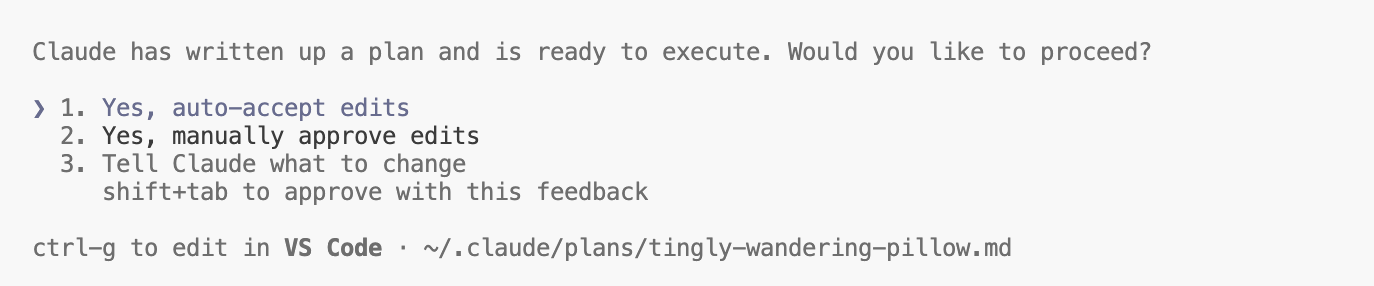
You have three options:
- Option 1 (Yes, auto-accept edits) — Claude implements the plan and auto-approves all file changes
- Option 2 (Yes, manually approve edits) — Claude implements but asks your permission before each edit
- Option 3 (Tell Claude what to change) — Refine the plan before executing
Step 4 — Refine the plan: Choose option 3 to give feedback before executing. Type your refinement:
Good plan. But do client-side filtering instead of calling the API
on every keystroke — we already have all tasks loaded. Also add a
clear button to reset the search.
Observe: Claude revises the plan to include your refinements without touching any files. You are having a design conversation, not a coding session. When it presents the updated plan, choose option 1 (auto-accept) to let Claude implement it.
If you prefer to skip the refinement, choose option 1 directly at the first prompt — Claude will implement the original plan as-is.
Observe: Claude follows its own plan step by step — adding the search input, wiring the filtering logic, styling it to match the existing board. Because the plan was solid, the implementation is structured and predictable.
Step 6 — Verify visually: If your TaskFlow server is still running in the other terminal tab, just refresh the browser window. If you stopped it earlier, switch to that terminal tab and run npm run dev again — it will reopen the app.
Observe: The Kanban board now has a search bar. Type a word and watch tasks filter in real time. You planned it, refined it, and Claude built exactly what you approved. The 30 seconds you spent reviewing the plan saved 10 minutes of undoing a wrong-direction implementation.
Claude Code has three permission modes that you cycle through with Shift+Tab. Each represents a different trust level:
| Mode | What Claude Can Do | When to Use |
|---|---|---|
| Default | Asks permission for every tool call | Learning phase, unfamiliar codebases, sensitive operations |
| Auto-accept Edits | Automatically approves file reads and edits | Active implementation when you trust the direction |
| Plan Mode | Read-only — no edits, no commands | Before starting any significant task |
The important design principle here is that Claude Code is fail-closed. If a tool call does not match any permission rule, it is blocked by default. You have to explicitly grant permission, not explicitly deny it. This means the system errs on the side of caution — unexpected operations require your approval.
In the Configuration section, we will go deeper into the permission model — how to configure allow/deny rules in settings.json, how to set project-level defaults, and how to create fine-grained permission profiles for different workflows. For now, the key takeaway is: you have control. Claude cannot do anything you have not authorized.
Claude Code defaults to Sonnet — the best balance of speed, quality, and cost for most tasks. You can switch models mid-session with /model:
| Model | When to Use |
|---|---|
| Sonnet (default) | Day-to-day coding, refactoring, tests — most tasks |
| Opus | System design, complex debugging, subtle cross-file bugs |
| Haiku | Quick questions, file exploration, trivial edits |
A practical pattern: start with Sonnet, switch to Opus when you hit a genuinely hard problem, then switch back when the hard thinking is done.
For problems that require multi-step reasoning — debugging concurrency issues, designing API surfaces, untangling circular dependencies — Claude Code gives you two dials.
Per-prompt keywords. Include think carefully, think hard, or ultrathink in a single prompt. Claude gets a private scratchpad to reason through that one problem before responding. Use it when a specific task genuinely benefits from deeper reasoning, not as a default.
Session-wide reasoning effort. Open the /model picker — below the model list you will see a reasoning effort selector (low / medium / high). This sets the default thinking budget for every prompt in the session until you change it. Useful when you are entering a sustained hard-thinking phase (system design, gnarly debugging) and don't want to retype a keyword every time.
The two compose: high effort + ultrathink in a prompt gives maximum thinking depth; low effort with no keyword keeps things snappy. Crank effort up when you need it, crank it back down when you are back to routine edits — higher effort costs more tokens and wall-clock time per response.
| Command | What It Does |
|---|---|
claude --continue | Resume the most recent session |
claude --resume | Interactive session picker — choose from recent sessions |
claude -n "feature-auth" | Start a named session — organize parallel workstreams |
Two escape sequences to memorize: Esc (once) interrupts Claude mid-action and returns to the prompt. Esc-Esc (twice) rewinds to the state before the last action, undoing any file changes. Think of single-Esc as "stop" and double-Esc as "undo."
The @ symbol lets you reference files inline in your prompts. Instead of saying "look at the logger middleware," type @src/middleware/logger.js and Claude reads it before processing your message. You can use multiple @ references in one prompt — "Compare @src/routes/tasks.js with @src/routes/users.js and make the error handling consistent".
Image input lets you paste or drag screenshots, diagrams, and mockups directly into your prompt. Claude analyzes the visual content and can act on it — implementing a UI from a mockup, debugging a visual issue from a screenshot, or following an architecture diagram.